An organized pantry is one of those small luxuries that improves daily life out of all proportion to the effort it takes. No more buying a third jar of cumin because you couldn't find the first two, no more expired cans lurking at the back, no more avalanche of bags every time you reach for the pasta. A well-organized pantry saves money, reduces food waste, and makes cooking genuinely more pleasant. And contrary to the glossy photos, you don't need a walk-in pantry or hundreds of dollars of matching containers to get there.
Here's how to organize a pantry — whether it's a walk-in, a closet, or a single cabinet — in a way that actually lasts, not just looks good for a week.
Step 1: Empty it completely
Start by taking everything out. It's the only way to see what you actually have, and it almost always reveals duplicates, forgotten items, and a surprising amount of expired food.
- Wipe down the empty shelves while you're at it.
- Check every expiration date and toss what's past it.
- Group like with like as you remove things (all baking, all snacks, all cans) so you can see your true quantities.
Step 2: Edit honestly
Before anything goes back, declutter:
- Toss expired food, stale snacks, and that experimental ingredient you bought once.
- Donate unexpired items you know you won't use to a food bank.
- Consolidate duplicates into one container.
A leaner pantry is far easier to keep organized than a crammed one.
Step 3: Zone by category
The single most important principle: group everything into clear zones so every item has an obvious home.
Common zones include:
- Baking (flour, sugar, baking soda, chocolate chips)
- Breakfast (cereal, oats, spreads)
- Snacks (a bin the whole family can reach)
- Pasta, rice, and grains
- Canned goods (soups, beans, tomatoes)
- Sauces, oils, and condiments
- Baking/cooking add-ins and spices
- Drinks (tea, coffee, mixes)
Decide your zones based on how your household actually cooks and snacks, then assign each a dedicated shelf or bin.
Step 4: Put it back with the right systems
Now reload the pantry with tools that fit your zones. You don't need everything here — pick what solves your specific problems.
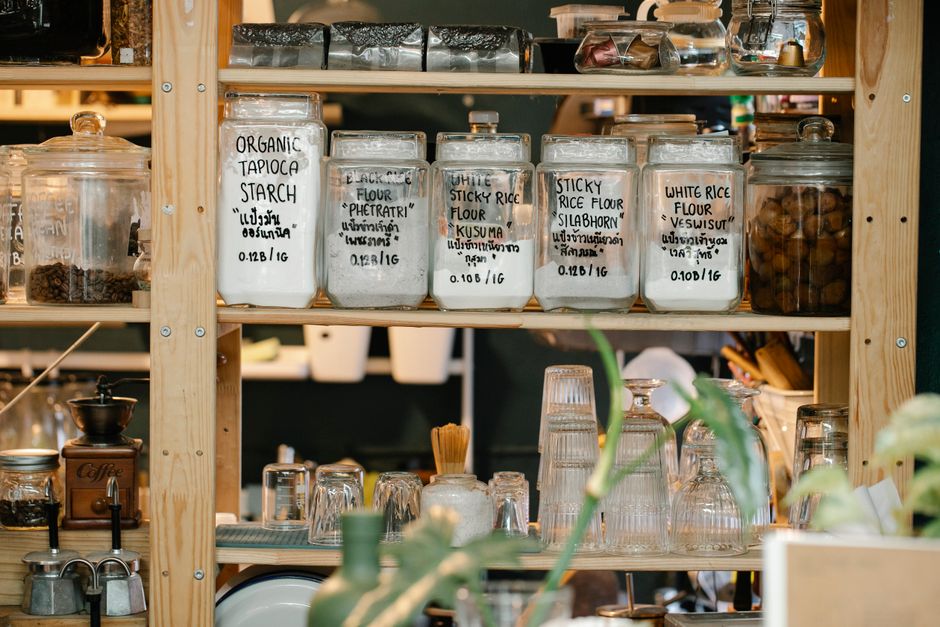
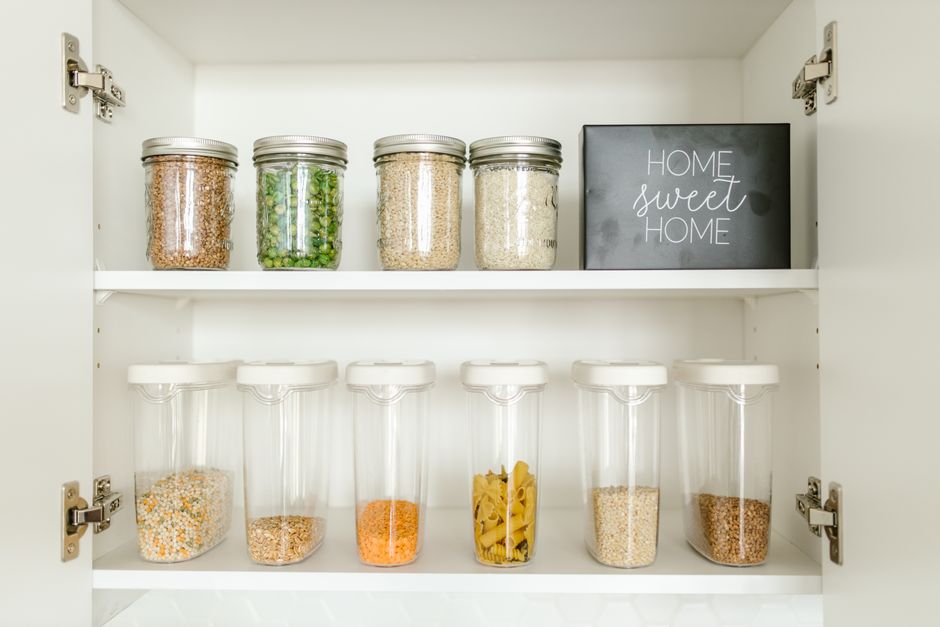
Clear, stackable canisters for dry goods
Decanting flour, sugar, rice, pasta, oats, and snacks into airtight clear canisters keeps food fresh, stacks neatly, shows you what's running low, and looks calm and uniform. This is the upgrade that makes the biggest visual difference.
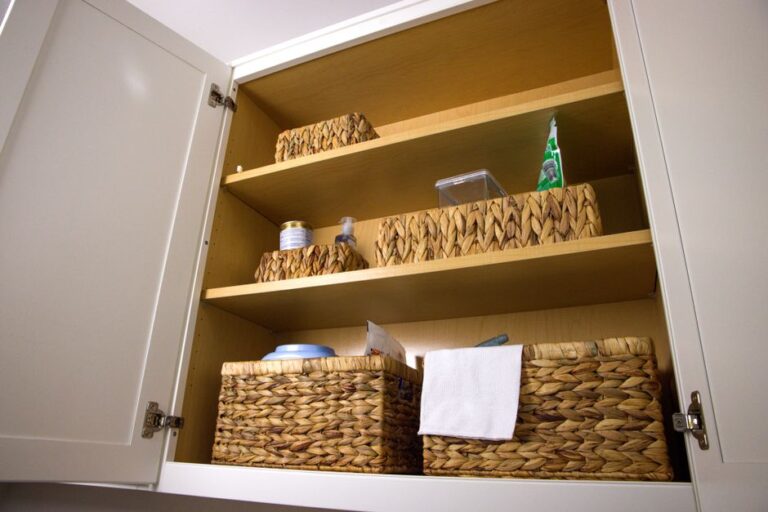
Bins and baskets to corral categories
Group snacks, packets, and odd-shaped items into labeled bins you can pull out like a drawer. This stops small items from getting lost at the back and makes the whole shelf tidy.
Turntables (lazy Susans) for bottles and jars
A turntable for oils, sauces, and condiments means nothing hides at the back — just spin to find it. Great in corners and deep shelves.
Tiered shelf risers for cans and spices
Step-style risers let you see every can or spice jar at a glance instead of stacking them where the back row disappears.
Door and wall space
Over-the-door racks and slim shelves add storage for wraps, foil, spices, and snacks — perfect for closet and cabinet pantries short on shelf space.
Shelf dividers and under-shelf baskets
Dividers keep stacks from toppling; under-shelf baskets clip on to capture wasted vertical gaps.
Step 5: Label everything
Labels are what make a pantry system stick — especially with a family. When everyone knows where things go, things go back where they belong.
- Label canisters and bins clearly (simple, legible labels beat fancy-but-unreadable ones).
- Consider adding "best by" reminders on decanted goods.
- Labeling also stops you from second-guessing which white powder is flour and which is sugar.
Step 6: Place items strategically
- Eye level: everyday items and healthy snacks you want to reach for.
- Lower shelves: heavy items, drinks, and kid-accessible snacks.
- Top shelves: bulk backups and rarely-used items in labeled bins.
- Front to back: practice "first in, first out" — put newer purchases behind older ones so nothing expires forgotten at the back.
Making it last: the maintenance habits
A pantry doesn't stay organized by accident. These small habits keep it that way:
- Decant or sort groceries as you put them away, rather than shoving bags in.
- Do a quick 5-minute tidy once a week, returning strays to their zones.
- Keep a running list on the door or your phone of what's running low, so you shop with purpose and avoid duplicates.
- Deep-clean and re-edit seasonally, checking dates and reassessing your zones as your habits change.
Budget note
You don't need a matching designer set to start. Repurpose jars you already own, use cardboard or fabric bins you have, and add a few inexpensive clear canisters and a turntable over time. The systems (zones, labels, first-in-first-out) do the heavy lifting — the matching containers are just the pretty finish.
The takeaway
A lasting, organized pantry comes from a clear process: empty it, edit honestly, zone by category, then reload with the right canisters, bins, turntables, and risers — and label everything. Place items by how often you use them, practice first-in-first-out, and keep it up with a quick weekly tidy and a running shopping list. Do that, and your pantry won't just look good for the photo — it'll stay functional, save you money, and make cooking easier for the long haul.
Frequently asked questions
How do I organize a pantry step by step?
Empty it completely, edit out expired and unused items, group everything into clear zones (baking, snacks, cans, pasta, etc.), then reload using canisters for dry goods, bins for categories, turntables for bottles, and risers for cans. Label everything and place items by how often you use them.
What are the best pantry organization containers?
Clear airtight canisters for dry goods, pull-out bins and baskets for categories, turntables for oils and sauces, tiered risers for cans and spices, and shelf dividers. You don't need all of them — choose the ones that solve your specific clutter problems, and you can repurpose jars and bins you already own.
How do I keep my pantry organized long-term?
Maintain it with small habits: decant or sort groceries as you put them away, do a quick weekly tidy returning strays to their zones, keep a running low-stock list to avoid duplicate buying, and re-edit seasonally. The systems and labels are what make it last, not just the initial cleanout.
Do I need matching containers to organize a pantry?
No. Matching canisters look lovely and help with stacking and freshness, but the real organization comes from zoning, labeling, and first-in-first-out habits. Start with jars and bins you already own and add a few clear canisters over time as your budget allows.
How do I organize a small or cabinet pantry?
Maximize vertical and door space: use tiered risers and shelf dividers, add over-the-door racks for wraps and snacks, use stackable canisters and clip-on under-shelf baskets, and zone tightly by category. Keep everyday items at eye level and backups up high in labeled bins.